- Stories
- Business Stories
- Adding and changing images on your All About Whitianga business listing page
Adding and changing images on your All About Whitianga business listing page

Showcase your business by adding quality images and 'hero shots’ of your products or services. Eye catching images capture the attention of your customers and assist in raising the profile of your brand and to sell your products or services. In this ‘how to article learn how to load and change the order of images on your All About Whitianga business listing page.
Help us get the word out!
If you like this article, please share it!
Types of media that you can add to your business listing page
Compliment the text on your business listing page by adding media to really showcase your work. There are three types of media you can add to your listing page:
- Images
- Video
- PDF documents.
Tips before you start to load media
Business Connect plans - A total of 12 images, 2 videos and 0 pdf documents can be added to your business listing page as part of your monthly subscription.
Business Connect Plus plans - A total of 18 images, 3 videos and 3 pdf documents can be added to your business listing page as part of your monthly subscription.
Connect Premium plans - Fully managed plan. A total of 24 images, 4 videos and 4 pdf documents can be added to your business listing page as part of your monthly subscription.
For all plans:
- Make sure that images are relevant to your business and good quality (use images that appeal to your customers)
- The maximum size of an image should be no bigger than 1500 pixels wide
- Images should be smaller than a 2MB file size and in jpeg or png format
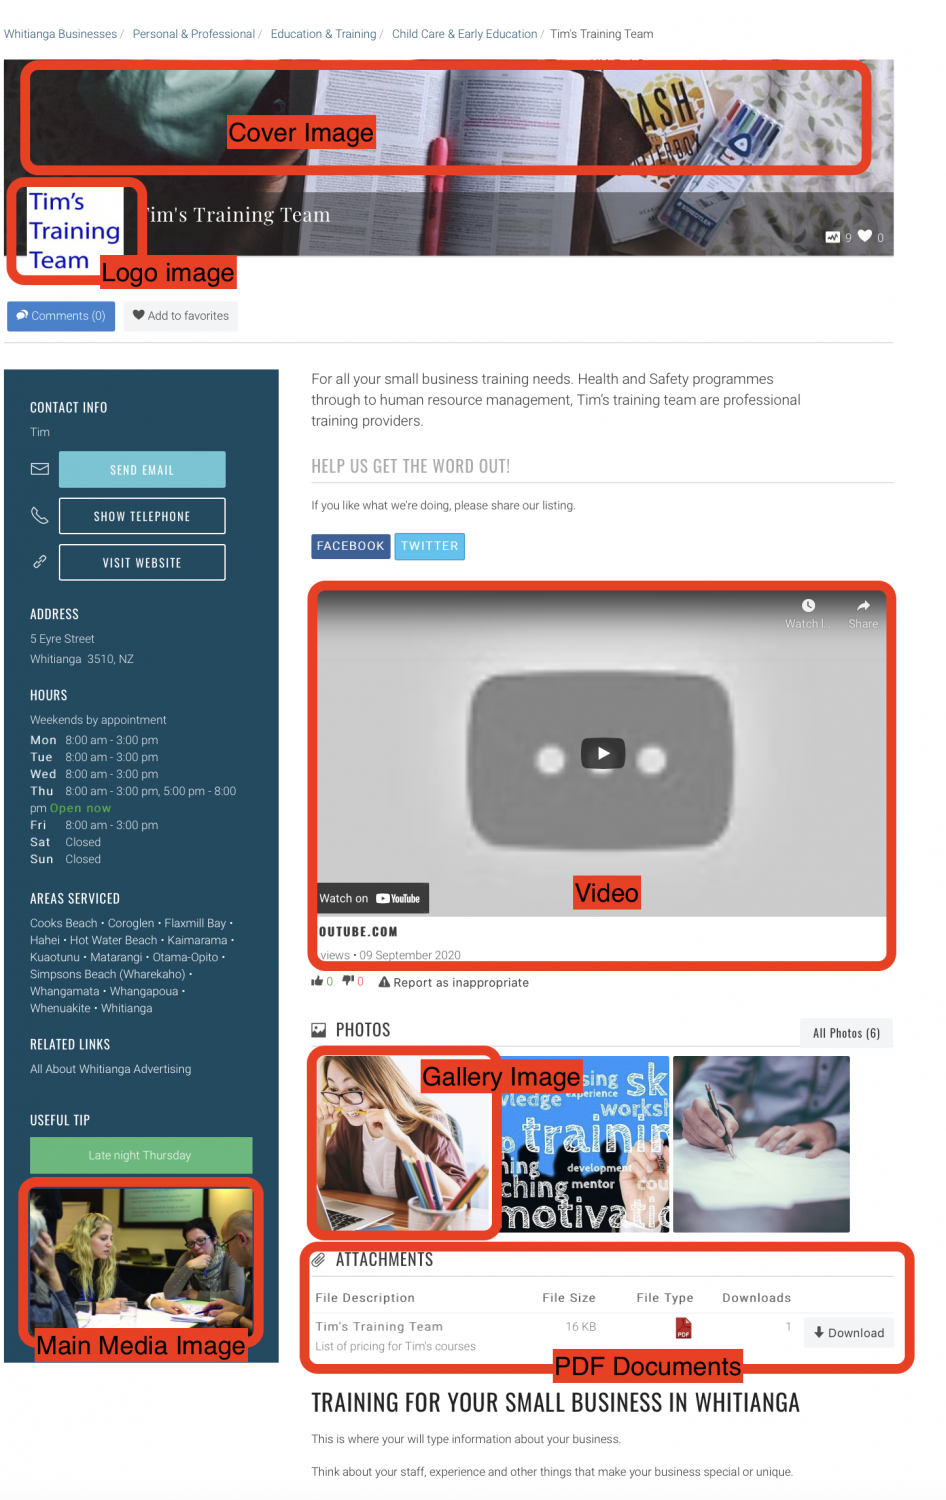
- Image size guide to enable best fit on the page (see graphic below to see where each of these sit on the page) - Cover image (1360X500 px), Logo (250X250 px), Gallery (650X650px), Main media (474X266px)
- PDF documents preferably no bigger than 5MB
- Video will be linked to Vimeo, Dailymotion or YouTube.
A reminder – your images, videos and documents should be yours. It is your responsibility to make sure that you are authorised to use them.
Step by step instructions to add images to your business listing page
1. Log in to your business listing page
On the homepage of All About Whitianga you will see a login area at the top of the screen. Click the login button and enter your details. If you need help with logging in see our how to guide on log in.

When logged in you will land on a page with details for your business listing, this is your Account dashboard.

If you aren’t taken to this page, just click the link to the Account Dashboard at the top of your screen- this will take you here.
![]()
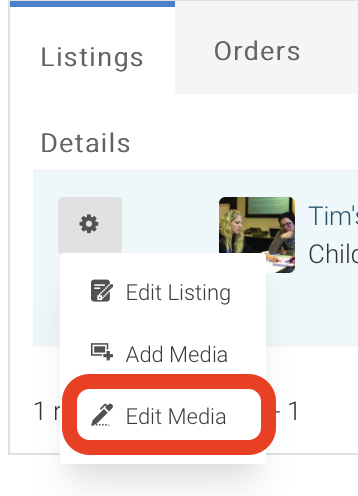
2. Cogwheel functions
You will see a listings tab and this shows the your listing with a cog wheel next to it.

Note: If you click onto your listing you will be directed to the listing page and will need to click the cog wheel again.
Select the listing you wish to add images to and click on the cog, then ‘add media’.

For images we have two options, we can upload from files on our computer or if using images from the internet we can upload from a URL link.
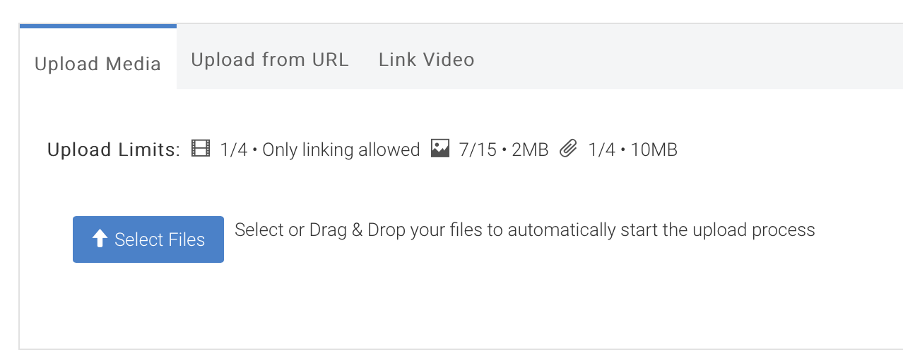
3. Selecting from your computer
You will need to select or drag and drop the file into the tab. Once the image files have uploaded you will be able to choose where they show on your listing page.

There are 4 different tags to use - Main media, Gallery, Logo & Cover.
Selecting these mean that the image will appear on different parts of your page.
Note: Main Media can be selected with any of the other three. However you cannot select an image as gallery & logo etc.
In the Title box, put a description in of the photo. Then click ‘update information’.

See how it looks by clicking on the back button.

4. Where do my images show on my page?
5. To Edit Images
Log on as above. Click on the cog and select 'Edit Media'.
A list of your images will show. You are able to edit where your images show by clicking on the Gallery, Logo, Cover and Main Media areas.
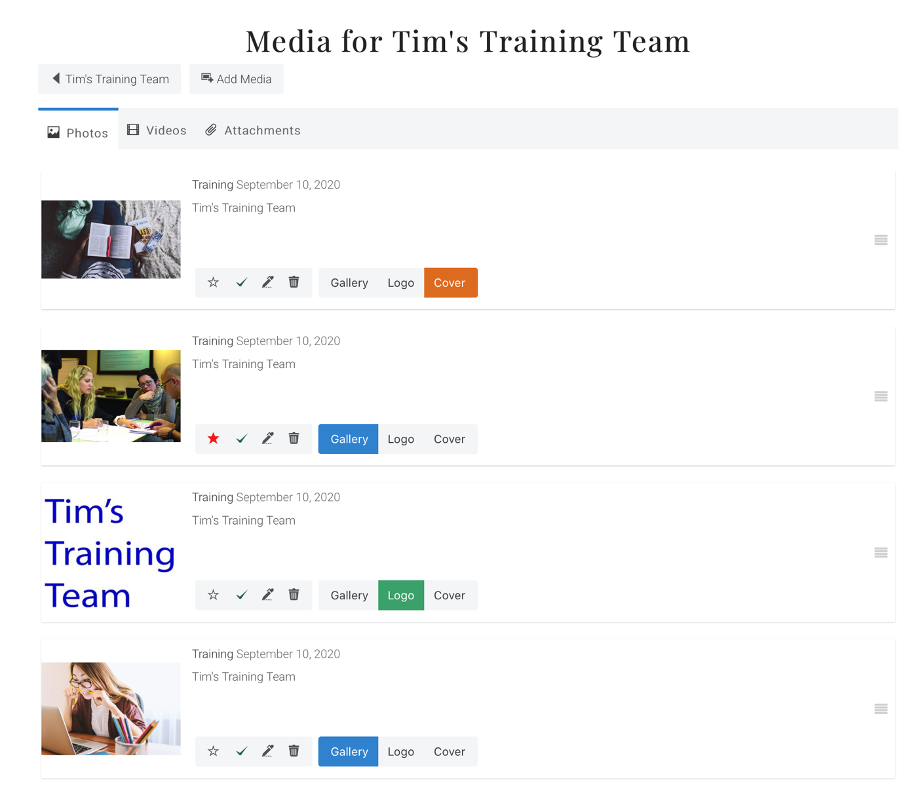
You are also able to unpublish by clicking on the tick.
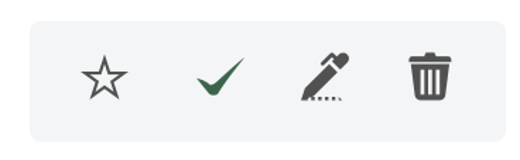
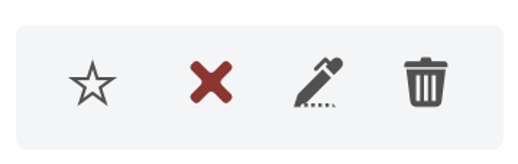
The rubbish bin will delete the image. It will not be able to show again until it has been uploaded again.
The pen will let you edit the image title.

6. Adjusting order in gallery
You will notice four lines on the right hand side of the page, by clicking and dragging up and down on these you are able to adjust the order your images show in your gallery.

Click on the link back to your page to see how your images look.

Top Tip: Make sure you save (submit) regularly, the page will 'time out' after approximately 90 mins.

Read More
Related Links
All About Whitianga AdvertisingMore Business Stories


Celebrating Three Years of Success: Major Milestone in Connecting Businesses and Jobseekers

Nominations now open for the Hauraki Coromandel businesses awards

Stay Updated with Your Favourite Information Using the All About Whitianga Follow Button

Could a local Coromandel Peninsula bakery win a national award?

NZI Rural Women NZ Business Awards 2024 Entries Open


Siddharth dishing up success in Thames-Coromandel District

Could a Coromandel Peninsula 'sneaky' sausage roll be a winner?


Seven tips to stay engaged with your customers during a recession
-
{{#owner}}
-
{{#url}}
{{#avatarSrc}}
{{name}} {{/url}} {{^url}} {{#avatar}} {{& avatar}} {{/avatar}} {{name}} {{/url}} - {{/owner}} {{#created}}
- {{created}} {{/created}}